Wednesday, October 17, 2012

Another Boat.......Sure Why Not?

I have a friend that has a MacGregor 26 and keeps it at Lake Pleasant here in Arizona. He is moving to Rocky Point, Mexico so I went over to visit. Apparently he had bought a home made 15 foot sailboat a couple months ago and now doesn't have the time or space to mess with it. So............I hauled it home and now.............it looks like a boat yard in front of my house.
It is ready to sail but needs some upgrades so I am considering making some changes. It has a heavy steel keel that is screwed into the boat with lag screws. (I have replaced those with bolts & nuts). I had a friend do some sail repair and, after buying a year's permit from the City of Tempe, I have had it on the water in Tempe Town Lake twice. It will actually sail in nothing but a breath of air and has a very responsive rudder. The trailer was custom made for this boat and has permanet AZ Tags. The boat itself is registered with the State of Arizona Fish & Game but I have removed the Reg. numbers as, not having a motor, it needs no such reg.


It is time now to get it out of my driveway so I am listing it on Craigslist tonight.

If I was to keep it, I would do the following upgrades:

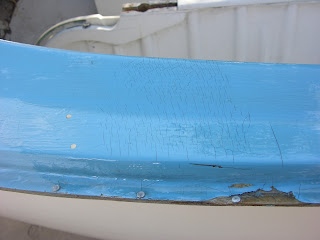
Since the interior was left raw wood, it got damp/wet, the wood expanded, and entire deck resin/paint cracked. I would belt sand the entire deck, fill and refinish.

It has no "floatation chambers and I would consider, either intertubes fore and aft or bulkheads fore and aft.

I have removed the shrouds (side mast stays) as the mast goes through a hole in the deck and seats (is stepped) on the keel. The Mast doesn't need side shrouds to stay upright at all. 

I would also spray the interior with white polyurethane and build a slat floor to keep from walking on the hull.

Also there is no cockpit drain but I have the hardware to install for the boat.

It would be perfect for a project boat as, being made of plywood, it is easy to work on AND it will sail now. 


                                                                        Looking Aft
                             
                                                                      Looking Forward


                                                                       Deck Cracking


                                                                             Keel


                                                                             Mast

                   
                                                               Checking Standing Rigging


                                                           New Keel Bolts w/ Chain Plate


Wednesday, October 3, 2012

Keel Trunk

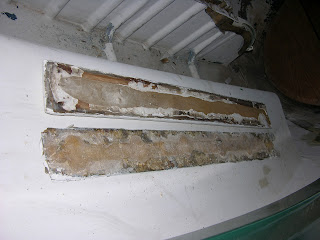
Admitting I can't leave well enough alone, I have decided to refurbish the Keel Trunk. I realize that I am still working on the cockpit details and will up date the previous post as I progress. I have removed the top of the Keel Trunk and after cleaning up the fiberglass top and re- fixing to the trunk, I will replace the wood top and side panels. Here is the trunk disassembled.


Sunday, September 23, 2012

In the Cockpit

Time to start on the cockpit. Not much to do here really but some definite changes.

First, the shrouds go through the gunnel and fix to brackets that are fixed to the front side of the seats. This is obviously to assimilate the strapping in larger boats that are fixed to the hull. Seems like a logical choice but I see no reason, with additional bracing, the shrouds couldn't be fixed to the gunnels themselves. So that is what I intend to do.

                         Original through gunnel hole bracket with the aluminum backing plate (now filled with thickened resin and painted over).


                            Bracket fixed to front of seat directly below hole bracket in gunnel.


Will post pics of under gunnel reinforcement when built........................................................


Second, I am cleaning up the Keel Trunk brackets. Will cut back 0.2 feet from deck/trunk join. Will reinforce with thickened resin as a filet.


Will post pics when finished.............................................................................................

Third, after having cut the glass on the transom looking for the hull # (see previous post), I was left with a area of the transom that was depressed to the wood. So I layered Matt into the gap. You can see where there is one layer and where there are two or three layers. Finished off with 2 coats of resin. Needs only a light sanding and is ready for paint.


Will continue to post pics as various parts progress.


Saturday, August 11, 2012

Deck & Gunnels


With the help of some friends, the hull has been flipped back over right side up (see previous post video - "The Hull", June 10, 2012). Now I can finish off the deck, gunnels and the inside. So I am approaching the deck and gunnels first. There is not too much to do but there are some important aspects. You can see that the jib sheet rigging has been changed from the original set up. I am not sure just why but the rigging crosses over the through way next to the centerboard trunk and restricts movement in the boat. I intend to move the jib sheet cleats back to the gunnels. There are several positions that can achieve this. I am not sure just where the fairings and cleats will be positioned but first things first, I have to prepare the deck for painting and the gunnels for affixing the fairings, cleats and paint. The gunnels were also fixed to the transom with metal "L" brackets. I intend to support this join with glass cloth & resin, inside and out, eliminating any bolts & nuts in that area.

BTW: work is limited to early mornings (95 degrees F) now that the average temp is over 110 degrees F this time of year in Phoenix, AZ. In the very cold parts of the country, you may stay inside in the dead of winter. Here we do the same in the dead of summer! Dry heat doesn't help at 115 degrees!


                                Existing Jib Sheet rigging on the left, proposed (original) on the right.


                                                             Gunnel to Transom join:


Labor Day weekend is here and I am determined to finish the deck and gunnels to the stage of being painted. Even from all I have read, I still do not have a clear understanding of Gel Coat. Assuming that it is just a layer of colored resin, I decided to "fix" the cracks in the top layer of the deck with the following steps. I gave the entire deck and gunnels a reasonable sand with 60 grit on my palm sander. Then I used West Marine Resin thickened with 403 filler, just to the point it would still brush on, to coat all the areas with spider cracks. When that set as a base, I brushed on another coat of resin but this time with no thickening agent. When that sets up I will sand with 60 grit followed by 220 grit. Then I will paint.................


                                             Two coats on and one more to go...................


Tuesday, July 17, 2012

Rudder Rebuild

I stripped the original rudder thinking it was in good enough condition to reuse. I sanded it down and filled the crack running down the center with West Marine Resin thickened with filler. The rudder had two aluminum bars each side that had been set into the rudder and was in effect a very good repair.


The aluminum fitting that mounted on the transom and joined the the rudder and tiller was cracked and was missing a piece at the top that held the butt of the tiller. This part was not available to purchase so I went to a local machine shop, Allied Machine Works, 438 West Watkins, Phoenix, AZ and had the piece reconditioned. The lip at the top was rebuilt and the shoulder cracks were welded and reenforced with an extra piece of aluminum.
                                                                                

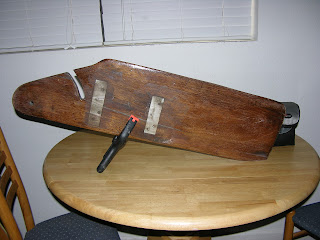
The rudder had a warp to it and having done the reconstruction up to now, I decided to just make a new rudder. I bought a piece of Red Oak from Home Depot 3/4 " x 10 1/2 " x 3 ' for $25. I used the old rudder for a template and cut out the new rudder. It fits the aluminum fitting perfectly. Now I have to shape the rudder and Epoxy it. So far so good.

                                                                             
                                                    Shaped and ready for Resin (today!)

                                                         4th and last coat of resin curing

Sunday, June 10, 2012

New Shirts

When I first bought my Laguna 18, sold some 5 years now in Arkansas, it was named "Second Wind". I changed the name to "In My Daughter's Eyes" (a song recorded by my favorite, Martina McBride). I did keep the name around though. My company that owned my restaurant "Rick's Place" (in Sharon, Kansas 2005 & 2006) was called Second Wind. Although I adopted the call name of "Sea Swallow" for this blog as that will be the name of the Chrysler 16 I am going to refurbish when I finish the Lido 14, I am retaining the name "Second Wind (Sail)" for the "entity" (me) that refurbishes small sailboats. So I unveil the new shirts I have just had made. I did the logo design and the shirts were made for me locally here in the Phoenix Metro area by:
                                 Duane Kilzer, 480-648-6800 / dkminus1@gmail.com


The Hull


Once I had the keel removed, I placed the hull back on the trailer, keel side up, so I could inspect and refurbish the hull. The first thing I wanted to do was strengthen the join between the hull and the keel trunk so I laid Glass Cloth along both sides of the keel trunk. The first attempt was to place a strip of Glass Matt in between the Cloth in a fold. That proved to be a real pain to get it to lay the way I wanted as the Cloth would not fold well and kept opening up. The second attempt was done by laying one piece of Cloth followed by a strip of Matt and another layer of Cloth. That seemed to work better but was not the finished seam that I really wanted. Oh well, I have moved on. I now only need to sand the second side as it has an unfinished Cloth edge up in the trunk. I am not sure I needed to do that but as I was already there and considering the state of the hull in all other aspects, I figured Why Not?

Secondly, what I found was not in anything I had read about. At the point where the support brackets for the mast support beam connected to the hull and at the spots where the support brackets for the keel truck sat on the hull, the hull had given way and bowed outward (like a bubble).  In the case of the mast support beam brackets, I just left them alone but on the bottom of the hull near the centerboard keel trunk, it looked like 4 speed bumps in the hull perpendicular to the length of the hull. I could not sand the high points down as that would have gone through the hull so I attempted to reduce the height on these bumps by ramping up from both sides. I did this on one (as it was near 3/8s of an inch) with layers of Glass Mat in a series of ever shorter layers. Then I finished off with layers of fiberglass bondo. The result was not a racing hull but clearly, an improvement. 

After accomplishing this effect to my satisfaction (when it comes to sanding, I am easily satisfied seeing no need to spend more effort than absolutely necessary), I was ready to paint, or so I thought. But when I inspected the bow, I found that it had been rammed into something (a dock?) and had 2 areas, one 7  inches long and one 4 inches long that had been shattered, filled from the inside with silicone, patched on the outside with bondo and glassed over with one layer of cloth. After sanding away the layer of cloth, the bondo cracked and literally fell out. So I ground down the area with my DeWalt grinder and a 60 grit sanding wheel. Then I applied one layer of cloth & West Marine Epoxy resin to the outside to give me something to work on. I could not now get to the inside without removing the bulkhead I had so substantially built previously.  Then I began to build up the bow with layers of Glass Matt. After getting about ½ the fill I wanted, I laid another piece of Glass Cloth. Again, more layers of Matt and finally 2 more layers of Cloth. I am just about there now and am going to lay a couple more layers of Matt and follow with one more layer of Cloth. The bow is now as hard as a rock and should withstand an amateur docking (of which I am capable). I have even considered putting a strip of oak on the bow but that is just too much effort to look pretty. I hope to finish that today and go over the hull one more time with 100 grit just to smooth it out that little bit more. I am not interested in using 200, then 400, and then wet sanding as I am not building a racing machine.   
As far as paint goes, I have purchased from West Marine, “InterLux Brightside” topside (meaning deck or hull above the waterline) Hatteras white. I plan to roll this on by hand. As this boat will only sail for a few hours per trip (and likely in inland lake waters), be washed off and trailer kept in the driveway, I see no need to use true bottom paint. I can’t find much reading material about painting boats even in all the small boat building articles available, at least none I can understand and apply to my situation. Most all send time on the prep work which the effect depends on the amount of time you put in (refer to my previous statement that 60 – 100 grit is good enough for me). I used this paint once before on my Laguna 18 because someone ran into me on the freeway (another story) and I absolutely loved the color. I think this paint will give the boat a softer “New England Classic” feel about it. Well here are the pics so far. I will add to this post with more pics as I finish off the hull. I just wanted to get this post started with pics up to now.

                                                        
                                                         Finally !!!    A painted Hull !!!    

                                                                
 I want to thank the guys for helping me flip the boat back over so I can now finish off the inside.
Mike Parker, Scotty Baker, Barry Brooks & my neighbor Gary. Thanks guys !