New Ship's Bell from Blue Pelican Chandlery in Alameda
Sunday, September 20, 2020
Up the Mast
Just a short entry here. Being a sailor means you have a mast to hold your sail or sails so maintenance of your mast is as important as any other part of your boat. Dinghys are easy, you just take the mast down. Deck stepped masts are also easy, you just take the mast down. But a larger boat with a keel stepped mast (a mast that goes through the deck and is fixed/mounted to the keel below the sole (floor)) is another matter. You can, usually during a haul out ("on the hard" - out of the water), use a crane to remove the mast from the boat or, as is more usual, you can climb the mast to inspect or perform repairs. There are several ways to ascend the mast, you can find several videos on Youtube if you are interested but suffice it to say I use a climbing apparatus (ATN Mastclimber) that includes a bosun's chair and foot straps that are connected to fixed climbing ascenders. You inch up the mast by standing, lifting your chair, sitting, lifting your foot straps, etc. This apparatus is connected to a halyard (rope) that runs from the foot to the top of the mast. There is also a safety line fixed to the climber and to a second halyard by way of a Prusik knot. This safety line goes up with you as you use the mastclimber (or any other method) to climb.


So, for the 1st time, I went up 3 times in the last few days to the 1st spreader (1/3 the way up) to repair the 3 lights at that location. One called the Steamer light (to be lit while "steaming" under power). This indicates that your boat is a power boat (a sailboat IS a power boat when running on the engine). The other two are the Spreader lights that shine down and illuminate the deck.
I was concerned that I would fear the height but not so. But the physicality of the climb would have been easier if I was even 20 years younger! I will say that the masthead (top) is a LONG way up. Still contemplating that climb.


Thursday, August 13, 2020
Alternator / Isolator Custom Build
Copied from my last post:
Now, there is really only one electrical challenge left, the engine alternator. For those that don’t know, a diesel engine (which is what I have) only needs power (battery) to turn the motor over to start it. There are no spark plugs like a gas engine as it explodes the fuel to drive the pistons simply by compressing it on one of the up strokes of the piston. So, the alternator in your car has to create electricity by being turned by the running motor to continually provide electrical power but the diesel only needs to charge the battery so it will start next time. Since I have a battery charger when plugged into the shore power at the dock, the alternator has no actual purpose at the moment and isn’t hooked up. It is just sitting there spinning, making electricity that isn’t going anywhere.
Now, if and when we are away from the dock, say off shore cruising, the batteries that start the engine and run the boat generally will need to be charged and running the motor (and hence the alternator) will be required. So that is now my last major electrical challenge but for the time being, being in the slip and having shore power, I am not lacking for battery charging capacity.
Update:
I removed the alternator from the engine and took it to NAPA Auto Parts. They sold me a replacement but there was a plug on the back that they had to order so, while waiting for a couple days, I started (continued) reading up on how to wire it in, I discovered that I had the wrong alternator. What I had was for an automobile not a boat, It was rated at 63 amps @ 6000 RPMs. My engine only does 2500 RPMs at full tilt. So, at the advice of a fellow boat owner 3 slips down from mine, I drove to Livermore to Dean's Auto Electric shop and talked to Dean. What I had was low output at high RPMs and what I needed was High output at low RPMs. So, he is building me an alternator that will put out 140 amps and will kick on at only 400 RPMs. He also sold me an Isolator which will connect both battery banks when the motor is running so both banks will charge BUT will disconnect (isolate) the battery banks when the engine is not running. In that way the engine battery will stay charged for starting the motor next time while using the House battery bank for lights etc.
So, now I only need to hook up the alternator and Isolator next week and I will have the 2 charging systems, AC / Battery Charger powered by Shore power and DC / the running motor when not in the marina (out cruising).


Thursday, August 6, 2020
Summer 2020 / Next 2 Major Projects
Electricity
As it happens, I started on
the electrical system. I watched enough YouTube videos to confuse myself but
eventually jumped into the wiring and started pulling out everything that was
not actually hooked up to something. Then I started cutting old wiring (like to
lights) and pulling those thinking I will run new wire when I get to that
stage. I also moved the battery charger from back in the Starboard quarter
berth to the side of the new electrical panel location. I also mounted all the
panels in the door of the new location whether they were hooked up or not. This
gave me a clean location at the Navigation (Nav) station (desk) to work from. The
system is a lot simpler than I thought. My next move, before hooking anything
up, was to reconfigure the batteries. I have 4 batteries and 2 were hooked up
to the motor AND the “House” and 2 were just sitting as backups, not hooked up
to anything. So, I made one dedicated to starting the engine only and 3 together
for the house. I was now at a standstill and at the limit of my understanding. So,
I called Tom Wolf, Marine Technician and very cool dude, and he spent an hour
with me on the phone listening and directing me on what to do next and why. The
following day I followed his direction and by the end of the day, I had the
battery banks separated, the motor running off the one and the bilge pumps
running off the other. I went home a very satisfied DIYer that night. I am now
ready to replace most of the old wire that I used to accomplish all this with
new wire and, when I get there, run all the new stuff like running lights.
OLD


NEW


Now, there is really only one
electrical challenge left, the engine alternator. For those that don’t know, a
diesel engine (which is what I have) only needs power (battery) to turn the
motor over to start it. There are no spark plugs like a gas engine as it
explodes the fuel to drive the pistons simply by compressing it on one of the
up strokes of the piston. So, the alternator in your car has to create
electricity by being turned by the running motor to continually provide electrical
power but the diesel only needs to charge the battery so it will start next
time. Since I have a battery charger when plugged into the shore power at the
dock, the alternator has no actual purpose at the moment and isn’t hooked up.
It is just sitting there spinning, making electricity that isn’t going
anywhere.
Now, if and when we are away
from the dock, say off shore cruising, the batteries that start the engine and
run the boat generally will need to be charged and running the motor (and hence
the alternator) will be required. So that is now my last major electrical challenge
but for the time being, being in the slip and having shore power, I am not lacking
for battery charging capacity.
Structure
Boat wiring being off my “Anxious”
list for the time being, that brings me to the biggest and most important
project, the actual “under the waterline” structure. Again, I offer remedial explanation.
Most will know what a keel
is, the heavy timber running the length of the boat. The structure of a sailboat
is shaped like the profile of a wine glass made up of oak frames tied into the
keel. Where they join the keel and perpendicular to them are floor timbers that
are fixed to the keel and bolted to the bottom of the frames. The planks that
keep the water out run the length of the boat and are screwed and/or riveted to
the frames. The whole thing keeps itself together by being fastened to itself,
just like teeth in your mouth. One gets loose, the rest start to get loose. All
wooden boats leak, loose boats leak more.
My main problem is that the bolts
fastening the major frames (1 major, 2 minor, 1 major, etc., etc.) to the floor
timbers are 60 years old and rusted almost out of existence. Where they go through
the floor timbers the holes are not so bad but where they go through the
frames, the holes have deteriorated (rotted) the frame wood badly. Now, the
proper thing to do would be to simply replace the frames from deck to keel but
that is rebuilding the boat. That is beyond my resources to do and I propose to
replace the bottom 18 inches of the frames, scarfing into the old solid frames.
You can look up scarfing if you like. My problem is, planks are fastened to the
frames from the outside so obviously, the boat has to be hauled out to do this.
17 tons of boat with no trailer can’t be placed in your yard to work on so it
requires a crane at a boatyard ($$$$$). It also requires, not only skill to cut
or laminate the frames (curved and beveled!!!) but knowledge to do this with
structural integrity in mind so the whole thing doesn’t break apart 3 miles off
the coast of Northern California while on our way to Vancouver! Finding a
shipwright with the experience has been more than a challenge as there are only
a very few and they are so busy, even being able to afford them doesn’t get you
to the front of the line. So, I am contemplating doing this all myself BUT, I
have found a shipwright that I contacted this morning so, perhaps I am getting
a bit closer to my last real challenge (besides the fear of actually sailing a
boat as big as a school bus when finished). Will let you know how it goes.
UPdate: The shipwright I found is not interested in my project. Also I went back to the shipwright in Sausalito that I had originally hoped to have do the work but he is simply too busy, had to have his crew tested as one came up with Covid, and it would have been just too expensive so I am on my own. But he did call after I left his place and he was very nice in chatting, offered to come and see the boat and also offered some structural advice which is really what I need. So.......I am starting the "plan" to haul out, probably in November.
UPdate: September 2020 / I have decided on a structural plan. I intend to pull the old rusty bolts and remove the rotten wood around them. The main frames being made of 6 laminations of 3/8 inch bent wood strips of oak and the top 2 strips still being good, I will treat the wood with CPES (Clear "Penetrating" Epoxy) which will stabilize the wood. I will leave the screws from the planks (coming from the outside) in to support Marine epoxy putty filler which will harden in place and replace the rotten wood. I will then replace the old steel rusted bolts with Silicon Bronze. I think this will suffice in refurbishing the structure. So that is the plan at the moment. Of course following the restructure, the planks, assuming they are good, will then be caulked with cotton, sealer and then painted. Yes, I am in way over my head but, who knows, I might pull it off yet!


Tuesday, July 14, 2020
Summer 2020 / Covid 19
The Year 2020 is moving along and the world is in the grip of the Covid 19 pandemic. Life has not changed for me that much except for not going out to eat since restaurants are restricted to take out/delivery. But as I am retired, my stay home habits, my income and my boat projects remain the same. I wear a face mask when I go to the hardware or grocery store and my social visits are restricted to one friend and my sister.
So, to the boat. I have two projects partially completed and 2 that have not yet begun.
First, after waiting for 3 different diesel mechanics to show up over the course of 2 months, I finally sat down and figured out how to get my engine wired up to the new gauge/ignition panel and got the engine running. It required priming the new fuel lines from the new tank and wiring the starter solenoid to the new panel. I used a hand ball pump (remembering my days with outboard motor tanks) to prime the line. It worked a treat. I managed to hook up the right wire to the right terminal and I now have a running engine. I still have to hook up the gauges but I think I will manage that.
When this was done, I needed to build a new engine compartment. The old one had the companionway stairs as the front and was so close to the engine there was a cut out to accommodate the engine coolant tank. So I removed the plywood from the back of the stairs, joined the foot of the stairs to the main steps and cut holes in the sides of the steps to reduce weight (the stairs are hinged at the top and lift from the bottom via rope and pulley). Then I had to move the steps themselves forward by 5 inches to clear the new engine compartment. I made the front of the engine box so it clips inplace and can be removed to inspect the engine without removing any screws. When all this was done, I lined the new box with foil lined foam insulation. The engine is quiet enough to talk over in the cabin now albeit I expect to be in the cockpit and moving if the engine is actually running.


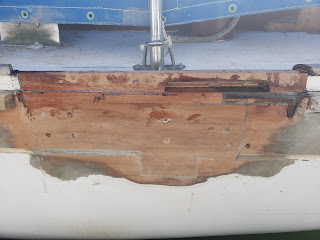
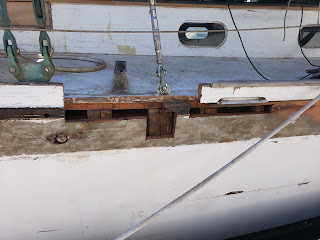
Second: the next project appeared when I found a small patch of rot at the rear supper on the port side. So, using a heat gun, I removed the paint from the whiskey board just below the rub rail, the hull plank nearest the top adjoining the deck and bulwark/toe rail. I went from about 4 feet forward of the transom to the side stays opposite the mast (about 20 feet in length). In doing so I discovered several areas of rot. In the end I determined that these were all caused by the rub rail screws being loose and water getting into the top plank near the scuppers through the back of the loose rub rail. With no real carpentry experience, I did what common sense dictates, cut out the rot and replace it with good wood. So that's what I did. I learned a lot about the hull, the wood, the epoxy resin, etc. Here are the pics of the port side.


Following the plank forward I found other spots that needed the same repair.


That took care of the port side but the starboard has a piece of bulwark that I pushed my thumb straight through so I expect to find the same state when I get to that side.
Now I have the next two projects pending. The wiring in the boat, although I believe was installed by a professional, is now a total mess. I am starting on this project as I have not managed to find a marine electrician that can show up that doesn't want 10 K to rewire the boat. The local guys are just to busy to ever really get to my boat. So I am stuck trying to understand and rewire it myself.
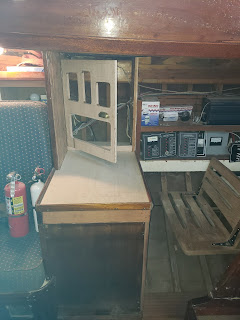
New door panel for electrical panels.


That's it for now. The next project will be described in the next blog post. It is extensive and involves frames, floor timbers, garboard plank, external plank caulking and bottom paint.
Subscribe to:
Posts (Atom)